Thursday, September 1, 2022

August Construction

 Construction is proceeding slower than I hoped.  Except for the yard area I have glued down roadbed on almost the entire junction half of the layout.  I also found a few more code 70 #4 turnouts.  This has allowed me to make a few revisions to the plan for the yard area.  Revised plan and photos below.

For September I hope to have the staging loop track installed, wired, tested, and running.   I purchased some constant on switch motors from Micro-Mark. Sweep sticks from FastTracks were also purchased to help with the track laying. Track for the yard area will be placed loose so that I can make any adjustments needed for buildings.


View from south end.  Track going to right top is for the wye to turn engines.
Overview of junction.  Elevated track in back will go to midpoint town.  Cardboard rectangles are building place holders.
View of the wye/ Tracks in middle of wye are for the meat packing company.  Far end of wye leads to staging.
North end of junction.  Both curved turnouts are #8, 36 and 32 inch radius code 83.  Spur tracks are for the team track (front) and furniture company (left back).   I still need to join the curve leading to the midpoint town that is laying on the board in back to the elevated track.


Sunday, July 31, 2022

July Construction

 Due to various circumstances, I did not get much construction done during July.   I did glue the roadbed down for the two lift outs from the staging tracks.   I also made all the car cards and waybills for the layout.   I have also been making some adjustments to the junction area.


Friday, July 1, 2022

June Construction

 I only got part way through what I was planning to accomplish in June.   There were too many other things to take care of the last part of the month.   I did complete the backdrops and most of the sub roadbed.  The benchwork sections are bolted together.

I found that I will need to cut out at least two more 30-inch radius quarter sections and maybe a third.  These will be for the town at the end of the line and/or where the track will pass over the interchange line as it goes to the mid-point town.  I will also need to cut risers for the highest loop.

I have also been experimenting with different arrangements of the yard and engine service facilities tracks.   The engine house and service facilities will be moving to the left end of the yard.  this will help protect the buildings.

The lift-out sections between the two halves of the railroad use door hinges to hold them in place and keep the tracks aligned.  Only one hinge for each end of the lift-outs is needed.

Some photos of the bench work and sub roadbed.   Also, the latest track plan.


For the sky of the backdrop, I found out about these rolls of bulletin board paper that come in 4 foot by twelve foot rolls and 4x50 foot rolls.   The roll was cut into a two foot and two one foot wide rolls.   The shorter side took slightly more than one roll to cover the hard board.   I used some double-sided tape to attach them to the hardboard.  Total cost for the four rolls of tape and one roll of paper was just under $65.  Next step is to paint some clouds on them and probably some mountains.


Revised yard area


The engine house (outlined building and sand house and fuel dock have been moved to the left end of the yard.  The caboose track is now at the front.  The team track has also been moved to the left of the new station location. 


Sunday, May 29, 2022

May Construction

I am posting this a couple of days early.  The benchwork is almost completed.   Roadbed is being laid for the staging tracks and the buss wire for it has also been run.   Hardboard for the backdrop has been installed on the east side of the layout.   I had to install the right half in two parts to get it to curve around the part of the wall that sticks out two inches.  The picture of the west side of the layout was taken mid-May.  All the lumber and other items on top of the benchwork are being stored there temporarily.   

Goals for June are to first get the staging tracks wired and operating.   Then place the sub-roadbed on the west half of the layout for the staging loop and interchange area.   This will be followed by roadbed, track and wiring for the complete staging loop including the two lift-outs at each end.  If all goes well, I hope to have the staging loop in operation by the end of June.  

I have also made some minor alterations to the track plan after learning a new trick using cornu curves in place of flex track in XTrackCAD.  XTrackCAD has a function button that allows you to add cars and locomotives and run trains around the layout.   The red lines in the picture below indicate the direction the turnouts are set to.  I put some cars and a pair of locomotives on the tracks and ran them around to check siding lengths.  

The program also measures the distance a train moves and I used that to find the distance from the start of the siding at the top left to the end of the track on the bottom half of the layout and then to the starting point.   Running point-to-point the mainline is 91.5 feet.   Including the continuous run section increases the total length to just over 100 feet.  Operations will be point-to-point with a turntable at the right end of the final town and a wye at the junction for turning locomotives.  The continuous run is there if I feel like just running some of the larger locomotives over the entire layout.

Motive power for the Modoc and Lassen will be a pair of 2-6-6-2T's and a 2-10-2T for the 1950's and three RSD-15's for the 1960's.   Actual start and end dates are 1953 when the Southern Pacific transferred the AC-9's to the Modoc Line and 1969 when ALCO stopped building diesel locomotives in the US.

I was also able to purchase a couple of locomotives on EBay this month.   The one on the left is a Mantua 2-6-6--2T full saddle tank logger.  It was listed as broken with a buy price of several dollars over $100.   The seller mentioned that it might be DCC equipped as it only hummed when he tried it on his DC track.   When it arrived, I put it on the test track and found it is DCC equipped with sound, etc.   The decoder is a TCS WOW sound unit.   I have to find out how to add a keep alive to it.   

The locomotive on the right is a NWSL full saddle tank logger that was listed on EBay shortly after the Mantua engine arrived.   It is in very good condition with added lights and crew.   I almost got it for a very low price but ended up paying almost the minimum price on the BrassTrains site due to a last second bid.   Fortunately, I had posted a higher total for my bid and did not lose out.   

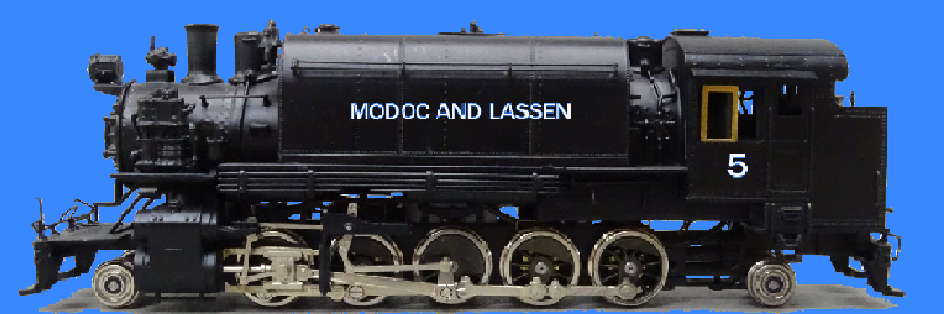
The Mantua locomotive was undecorated while the NWSL was decaled for a fictional road.   I removed the decals using MicroSet and MicroSol and rubbing them with a cotton swab.   They came off after several minutes of rubbing.   I then decaled both for the Modoc and Lassen.   The NWSL already had the number 8 and I numbered the Mantua as 6.

Both are supposed to represent the same engine.   As can be seen the Mantua is much larger and has several inaccuracies such as both air reservoirs at the front of the saddle tank. On the prototype locomotive one is toward the rear.     The drivers are 55 inches in diameter compared the 44 inches of the prototype. Since it is only intended as a spare engine for running at the club and to use while a decoder, keep alive, and speaker to the other , that is okay.


Sunday, May 1, 2022

April Construction Update

The framework for the east wall of the garage stall has been completed and that for the west wall has been started.   Half the plywood for the staging tracks has been installed and the other half is waiting for additional support pieces to be installed.   The plywood for the upper and lower towns has also been cut to size.  

The following photo shows the front half of the east wall framing.   Each framing section is three feet wide by eight feet long.  The two sections will be bolted together with carriage bolts.   The legs are attached with carriage bolts.   The support pieces are held in place by 1.25-inch wood screws.  I had originally intended for the legs to be removeable but had to permanently attach them due to needing them supporting the upper level of the track.  

I have also drawn the curved plywood sub-roadbed pieces to be cut out of the remaining sheet of plywood.  These can be seen in the second photo.  These will probably take a day to cut out with the jig saw.  These are 30-inch radius quarter circles.  Most of these will be for the loop area on the northeast end of the layout (see track plan) along with connecting the upper-level town on the east side to the loops.  

I also need to go to the hardware store for more 1.25-inch wood screws and 1x3 inch lumber for support pieces.  I will also check to see if the store has any cans of mistake paint that is close to sky blue.   Every once in a while, when they are mixing paint, they will make a mistake and end having to make a second can of the correct color mix.   The mistakes are usually a lot less expensive than buying a can.

I have levelled the front section of framing to match the rear section when it is level again.  The floor has about a two percent slope from the rear of the garage to the front.  

May construction plans are to finish the framing for the west wall, lay roadbed and track for the staging yard and maybe complete the lower-level loop connecting the two ends of the staging yard to the rest of the layout.  Then wiring the track so I can run a train or two.  The staging tracks are about 18 feet long and will hold two normal sized trains each.

Monday, April 11, 2022

More ALCO's

 I finished decaling the three RSD-15's for the Modoc and Lassen.   They were bought/leased from the Saint Louis Southwestern through the Southern Pacific.   Only the name was painted out and replaced with the road numbers remaining the same.  The lettering on the middle locomotive is okay.   I will have to use some Micro Sol to remove the air bubble that makes it look wrong.


Saturday, April 2, 2022

ALCO's

 I was able to obtain several RSD-15s at a good price.   Three of them will be lettered for the Modoc and Lassen, two will remain as Southern Pacific, and two are being repainted and lettered for the Gorre and Daphetid.   

I know John Allen disliked diesels, but his railroad was set in the first half of the 20th century.   Mine is set in the 1950's to the early 1970's.   Economics was the driving force in railroads dieselizing.   As such, the Gorre and Daphetid would have also done so if reluctantly.  

In addition to the two RSD-15s I have also painted and lettered an ALCO Century 636 for the Gorre and Daphetid.   Except for one steam locomotive that appeared on the G&D roster for a brief time all of them were numbered lower than 100.  For the diesels I have started with 100 and gone up to 132 for a fictitious roster including other RS and RSD locomotives along with other century series engines.   Below are two photos of the C636 and one of the RSD-15's as painted for the Gorre and Daphetid.  The other RSD-15 is numbered 106. 


Tee Shirt

 I decided to make a custom tee shirt design for the railroad.   Allied Shirts was the company I chose.   Their site offers a variety of clothes that can be customized with the design you choose.   I located pictures of the three ho scale steam locomotives that would be used for the railroad.

Using Paint Shop Pro I replaced the background with a color that was as close as I could make it to the color I decided to use for the shirt.  The three modified images are below.  When I decal the locomotives I will may change #108 to just #8.  The image of #5 is to the same scale as the two mallets though I enlarged it to match the width of the other two on the shirt   The tee shirt with the added images is below them.

#5 is from the Sugar Pine Lumber company and got the nickname of Minaret for the mountains near the lumber road.   #108 was originally a coal burner that was built for the Potlach lumber company as #24.  This resulted in two of the air reservoir tanks being mounted on the top of the water tank.  It was later converted to oil and transferred to Weyerhauser.  The tank mounted reservoirs were removed.  It is still in service today on the Black Hills tourist road.   #4 was originally built for the Clover Valley Lumber company and later went to the Feather River Lumber Company.   It is also still in service as a tourist locomotive and has been on the Niles Canyon Railway.

The #5 is in the book "Rails to the Minarets".  #4 and #108 and their Baldwin sisters are covered in the book "Timber Titans"


Wednesday, March 16, 2022

Industries


I have chosen several different industries for each of the towns on the layout.   At the junction there will be a furniture company on the left, a produce and canning company at the center top, and a meat packing company in the middle of the wye.   There will also be a team track on the first spur off of the yard lead, and engine house at the bottom center and engine servicing facilities on opposite facing spur from the yard.

The town at the end of the line will have a cement plant, brewery, building supply company, fuel oil supply company, a warehouse and a team track.  The cement plant will be at the left end of the town.   

For the middle town the industries will be a stock yard at the lower left corner, a lumber company at the lower right, a fuel oil company, warehouse, a feed and grain company, and a team track.

All three staging tracks are longer than 16 feet.

Saturday, March 5, 2022

Track plan lower level

 The following is the initial track plan design for the lower level of the layout.   This includes the three-track staging yard at the bottom of the image, the interchange junction at the top, the end of the line at the bottom above the staging yard and the two lift-outs for the lower level.   The lift out section at the right may be two separate parts since the track from the loop area the terminus is on an opposite slope of the one leading to staging. 


The two main parts of the layout are three feet deep and sixteen feed long and the upper part has about another two feet of additional depth for the loops.   There is a four-foot opening between the two halves.  As previously posted the main has a minimum radius of 30 inches.   When I start laying track, I will attempt to adjust the wye so that it has a larger radius.

The upper section with the middle town, which will be above the staging yard has not been finalized at this time.   I hope to fit all the terminus structures and tracks into an 18-inch-deep area leaving the same depth for the upper-level middle town.  The two lift out sections connecting the upper level will be above the lift out sections connecting the staging yard.  These may be joined to the lift outs for the staging yard.

Sunday, February 6, 2022

cameras

 I have seen a number of videos made with cameras mounted in front of the train and one mounted on a car behind the locomotive.   One of the videos recommended a camera from Amazon for less than $20.  This is a link to one that I found there camera

This is a link to the video with the camera mounted behind the locomotive  California Central

There are several at this price range or less.

The next camera is more expensive, but has a four star rating compared to the two star ratings for the less expensive ones better camera


Westside Models 2-10-0 The Brute

 In 1979 Westside Models released the first in a proposed series of free lanced HO scale locomotives.   This was a fictional 2-10-0 that app...